Subscribe Us

This is default featured slide 1 title

Go to Blogger edit html and find these sentences.Now replace these sentences with your own descriptions.

This is default featured slide 2 title

Go to Blogger edit html and find these sentences.Now replace these sentences with your own descriptions.

This is default featured slide 3 title

Go to Blogger edit html and find these sentences.Now replace these sentences with your own descriptions.

This is default featured slide 4 title

Go to Blogger edit html and find these sentences.Now replace these sentences with your own descriptions.

This is default featured slide 5 title

Go to Blogger edit html and find these sentences.Now replace these sentences with your own descriptions.

Showing posts with label chromeos flex. Show all posts

How to Purge Wine from Chromebook and Chrome os

 To thoroughly purge and uninstall Wine from Debian, start by opening up a terminal window on the Debian desktop. Do this by pressing Ctrl + Alt + T on the keyboard or search for “Terminal” in the app menu. Next, use the rm command to delete your Wine folder from your home directory with the terminal window open. This folder holds all Wine-related apps.

rm -rf ~/.Wine

Next, use the apt-get remove command to uninstall the Wine app and any Wine-related programs on Debian. Finally, be sure to use the –purge command-line switch, as this will also erase any configuration files that happen to be on the system. 

sudo apt-get remove wine* --purge

When everything is uninstalled from Debian, you’ll also need to use the autoremove command to get rid of any remaining Wine packages that might still be there. 

sudo apt-get autoremove -y

Now that the autoremove command is complete, Wine will be purged from Debian.

How to Install mpv player [Potplayer and KMplayer like interface]

 MPV player is one of the most widely used media players used on Windows, Linux and macOS. It is an extremely lightweight player, and you have to customize it according to your need. We have already discussed the differences between the VLC media player and an MPV player, so if you are not into customizations and just need to have a video player that “just works,” then the MPV player might not be for you.


As a user who has used a VLC media player his whole life, I found certain things which I didn’t like about this player, such as the Keyboard shortcuts and the overall look of the player. So I changed it using Lua scripts available on GitHub and a few custom key bindings. In this tutorial, we are going to discuss exactly those customizations which will make it feel more like a VLC player.

sudo apt update && sudo apt install mpv

Now you can run mpv player.

How to Install JDownloader in chromebook [Without Flatpack]

 JDownloader is a great tool that can be used to download files from multiple servers simultaniously. It is open source and is supported on all major platforms, the tool is written in Java. It comes in handy when you have to download multiple files at once located at different file hosting services. This tool provides you with the control to pause, stop or start the downloads. It allows you to set bandwidth limitations and it saves a lot of time by changing the way you download files from the internet.

In this article, we will explain how to install JDownloader on a Debian OS. We have used Debian 10 for running the commands and procedure described in this article.

How to Install JDownloader on Debian

First, we will need to download the installer file for the JDownlaoder2 setup. To do so, open the following link:

https://mega.nz/#!LJ9FyK7b!t88t6YBo2Wm_ABkSO7GikxujDF5Hddng9bgDb8fwoJQ

When the link opens, you will see the following page. Click on the Download button to start downloading the file. The downloaded file will be saved to your Downloads directory.


Click the Save File button. The downloaded file will be saved to your Downloads directory


Then, type the following command and press Enter in order to execute the JDownloader setup file:

$ sh JD2Setup_x64.sh

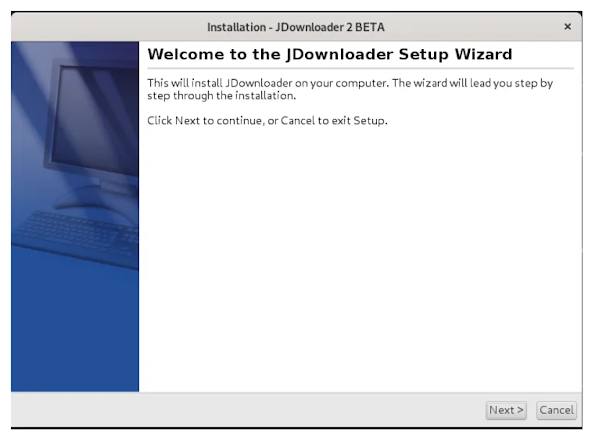
The following installation wizard will appear for you to start the installation process. Click Next.


The following dialog box allows you to view the General Public License. Click Next to continue.

Next, it allows you to choose the destination directory where you want to install the JDownloader. Browse the directory and click Next.


Next, it allows you to create a desktop icon. If you do not want to create a desktop icon, uncheck the box and click Next.


Now the installation will be started and you will see the following window showing the progress of the installation.


Once the installation is finished, you will see the following window. If you want to launch the JDownloader right after the installation, keep the Run JDownloader box checked and click Finish to close the wizard.


Launch JDownloader

To launch JDownloader, hit the super key on your keyboard. From the search bar that appears, search for JDownloader by typing its keyword. When the result appears, click on the JDownloader 2 icon.


Uninstall JDownloader


JDownloader is a great tool that can be used to download files from multiple servers simultaniously. It is open source and is supported on all major platforms, the tool is written in Java. It comes in handy when you have to download multiple files at once located at different file hosting services. This tool provides you with the control to pause, stop or start the downloads. It allows you to set bandwidth limitations and it saves a lot of time by changing the way you download files from the internet.

In this article, we will explain how to install JDownloader on a Debian OS. We have used Debian 10 for running the commands and procedure described in this article.

How to Install JDownloader on Debian

First, we will need to download the installer file for the JDownlaoder2 setup. To do so, open the following link:

https://mega.nz/#!LJ9FyK7b!t88t6YBo2Wm_ABkSO7GikxujDF5Hddng9bgDb8fwoJQ

When the link opens, you will see the following page. Click on the Download button to start downloading the file. The downloaded file will be saved to your Downloads directory.

Download JDownloader

Click the Save File button. The downloaded file will be saved to your Downloads directory.

Save archive file on disk

Once the downloading is finished, navigate to the Downloads folder from the Terminal in your system. To open the Terminal, go to the Activities tab located in the top left corner of your desktop. Then by using the search bar, search for the Terminal application. When the Terminal icon appears, click on it to open.

Now type the following command in Terminal to navigate to the Downloads directory.

$ cd Downloads

Then, type the following command and press Enter in order to execute the JDownloader setup file:

$ sh JD2Setup_x64.sh

The following installation wizard will appear for you to start the installation process. Click Next.

Setup wizard

The following dialog box allows you to view the General Public License. Click Next to continue.

Accept GPL License

Next, it allows you to choose the destination directory where you want to install the JDownloader. Browse the directory and click Next.

Installation directory

Next, it allows you to create a desktop icon. If you do not want to create a desktop icon, uncheck the box and click Next.

Create Desktop Icon

Now the installation will be started and you will see the following window showing the progress of the installation.

Extracting files

Once the installation is finished, you will see the following window. If you want to launch the JDownloader right after the installation, keep the Run JDownloader box checked and click Finish to close the wizard.

Setup completed

Launch JDownloader

To launch JDownloader, hit the super key on your keyboard. From the search bar that appears, search for JDownloader by typing its keyword. When the result appears, click on the JDownloader 2 icon.

JDownloader Icon

When launched, you will see the following default view:

JDownloader

Uninstall JDownloader

In case you want to uninstall JDownloader, navigate to the folder where it is installed. By default, JDownloader is installed in the JD2 under the Home folder. So open the Terminal and run the following command in order to navigate to the JD2 directory.

$ cd jd2
$ ./Uninstall\ JDownloader

Now if you view the contents of the JD2 folder using the ls command, you will see the “Uninstall JDownloader” file. This is the file that we can use in order to uninstall JDownloader.


how to install smplayer latest in chromebook [potplayer & kmplayer]


SMPlayer is a free media player for Windows, Linux and Mac OS with built-in codecs, which can also play Youtube videos, search and download subtitles, and includes other features like a thumbnail generator and audio and video filters

This viodeo player work like Potplayer and Kmplayer

echo 'deb http://download.opensuse.org/repositories/home:/smplayerdev/Debian_11/ /' | sudo tee /etc/apt/sources.list.d/home:smplayerdev.list
curl -fsSL https://download.opensuse.org/repositories/home:smplayerdev/Debian_11/Release.key | gpg --dearmor | sudo tee /etc/apt/trusted.gpg.d/home_smplayerdev.gpg > /dev/null
sudo apt update
sudo apt install smplayer
smplayer

How to install JDownloader 2 lates on a Chromebook [Like IDM]


Today we are looking at how to install JDownloader 2 on a Chromebook.  Please follow the video/audio guide as a tutorial where we explain the process step by step and use the commands below.


If you have any questions, please contact us via a YouTube comment and we would be happy to assist you!

Commands Used:

sudo apt update
sudo apt install flatpak
sudo flatpak remote-add --if-not-exists flathub https://flathub.org/repo/flathub.flatpakrepo
sudo flatpak install flathub org.jdownloader.JDownloader
sudo chown root:root /usr/bin/bwrap && sudo chmod u+s /usr/bin/bwrap
flatpak run org.jdownloader.JDownloader
flatpak override --user --filesystem=/mnt org.jdownloader.JDownloader
flatpak run org.jdownloader.JDownloader

How to Customizing MPV player in chromebook

MPV player is one of the most widely used media players used on Windows, Linux and macOS. It is an extremely lightweight player, and you have to customize it according to your need. We have already discussed the differences between the VLC media player and an MPV player, so if you are not into customizations and just need to have a video player that “just works,” then the MPV player might not be for you. 


Customizing MPV player

Now, let’s start customizing, open your terminal and type the following command to clone scripts from GitHub :

1
git clone https://github.com/maoiscat/mpv-osc-modern

You can use any theme listed on this page.

Now, let’s create a directory which will store all of our scripts and will be utilized by MPV :

1
mkdir ~/.config/mpv/scripts

Now, from the cloned directory, let’s move the Lua scripts into our newly created directory. Type :

1
mv mpv-osc-modern/modern.lua ~/.config/mpv/scripts

Create another directory which will host the font required by this script :

1
mkdir ~/.config/mpv/fonts

Again, move the font in this directory by typing :

1
mv mpv-osc-modern/Material-Design-Iconic-Font.ttf ~/.config/mpv/fonts

Well, that’s it, open any file now to check what mp looks like now :

MPV Player New Interface


I’ve also added other scripts such as file-browserautoload, and cover-art. You can add them using the above method.

There are many more scripts listed on this page, so you can install any of them that suits your needs.

Now, This part is optional, but I have also changed the key bindings of various actions, you can also do this by creating a file named input.conf using your favourite text editor, type :

For nano users
nano ~/.config/mpv/input.conf

Press ‘I’ to get into insert mode if you are using vim. My config file looks something like this :

Custom Key bindings For MPV Player


The above configuration does the following :

UP add volume 3 DOWN add volume -3 WHEEL_UP add volume 3 WHEEL_DOWN add volume -3

or

  • ‘The up arrow key’ increase the volume by 5 units
  • ‘Down arrow key’ decreases by 5 units
  • ‘Mouse/Touchpad scroll up’ increases the volume
  • ‘Mouse/Touchpad Scroll down’ decreases the volume
  • ‘Swiping left on touchpad’ goes 5 seconds back
  • ‘Swiping right on touchpad’ goes 5 seconds forward
  • ‘n’ Key will play the next media in the playlist
  • ‘p’ key will play the previous file in the playlist

If you are using vim, then press the Escape key and type :wq to save and exit. If you are using nano editor, then press Ctrl+O and Ctrl+X to save and exit.

You should also edit the mpv.conf file to suit your needs, open it in either vim or nano using :


 nano ~/.config/mpv/mpv.conf

Add the following lines :

1
2
3
4
5
6
7
8
9
10
11
12
13
save-position-on-quit=yes
# The default volume of mpv when you open it
volume=90
blend-subtitles=yes
screenshot-directory=~/Pictures/Screenshots
screenshot-format=png
osc=no
# You should read about Hardware acceleration on mpv to choose your correct settings
hwdec=vaapi
# Display English Subtitles if available
slang=en
# Defalt audio language
alang=en

Press Ctrl+O and Ctrl+X to save and exit if you are using nano and press the Escape key and then type :wq to save and exit out of vim editor.

Enable the ‘autoload’ script by adding a file named autoload.conf file in the script-opts directory :


nano ~/.config/mpv/script-opts/autoload.conf

Add the following lines :

1
2
3
4
5
disabled=no
images=yes
videos=yes
audio=yes
ignore_hidden=yes

Again, save and exit out of your editor.

If you have enabled the file-browser script, then you can access the file browser from the terminal by pressing Ctrl+O key, and navigating between the directories using the arrow keys on your keyboard.